FAQ
First thing would be to login to your dashboard, and update your e-mail address. You can do this by going into Users > Your Profile and updating your email address there. Please ensure that you also verify your e-mail address once you update. This would ensure that if you lose your password later or get locked out of your site, you can easily reset it and get back in.
Second, check for updates. Plugins and themes get regular updates from their respective vendors which will be made available to you from time to time. You can see all the available updates under the Dashboard > Updates tab.
Here’s a list of all the plugins that we have included in each blog:
Akismet Anti-Spam: Helps to protect your blog from spam.
Classic Editor: In case you don’t like working with Gutenberg blocks, you can enable this and use the old classic editor.
Contact Form 7: Create contact forms with this plugin. There are a few contact forms that we’ve created for you to use in your blog.
Duplicator: Backup plugin. This would be enabled when you restore your blog from the file we provide. You can use this or the WPVivid plugin (in this list) for regular backup of your website.
GDPR Cookie Consent: Shows the GDPR cookie consent popup on the footer of your blog. (A cookie policy has been created using this plugin’s Policy Generator, and added to your blog’s footer).
Google XML Sitemaps: Creates sitemaps for your website, helping search engines to index your pages for better SEO.
Hello Dolly: Default plugin that comes with every WordPress install. You can choose to delete this if you want to.
Jetpack: Has many powerful features including site monitoring, spam protection (linked to Akismet), plugin/theme update management, visitor statistics, etc.
MyCurator: Content curator plugin.
Newsletter: Powerful newsletter plugin that helps you set up your newsletter and manage your subscription. (The Newsletter tab at the top of your blog has a form linked and configured from this plugin).
Shortcoder: Create your own content shortcodes to be used anywhere on the site. For example, create a shrotcode and add your opt-in form HTML code to it, and use it anywhere on your site. (You can use this to replace the Contact Form in the header section with your opt-in form code).
Slider by 10Web: Create responsible image sliders and add them anywhere on your blog (You can use this to add an image slider to your header section).
Wordfence Security: Your complete Anti-virus, firewall and malware scan solution. Schedule it for regular scans and get alerted about malware on your site.
WP Forms Lite: Another contact form plugin, including drag/drop features, if you don’t like Contact Form 7. (Disabled by default)
WPVivid Backup Plugin: Backup plugin. This would be enabled when you restore your blog from the file we provide. This can be used to schedule regular backs to local or remote storage, and quick restoration of you blog in case of issues.
Yoast SEO: All in one SEO Solution for WordPress, helps you check your content for readability, analyze for SEO, etc.
Here are a couple of things you need to consider:
1) Please ensure that you’re using the correct password. The default password to login to your dashboard is given at the top of your blog downloads section.
2) Please ensure that you’re using the latest version of PHP on your site (PHP is the underlying software which powers WordPress). The recent versions of WordPress requires that the version of PHP available on your domain should be 7.1 or higher, or it could throw errors. Your host’s cPanel will have an option to update your PHP settings from where you can make this change easily. You can alternatively contact your host to do this for you (or send us an e-mail with your details and we’ll be glad to check it out for you).
If the above does not resolve the issue, please send us an e-mail at [email protected], and we’ll check it out for you.
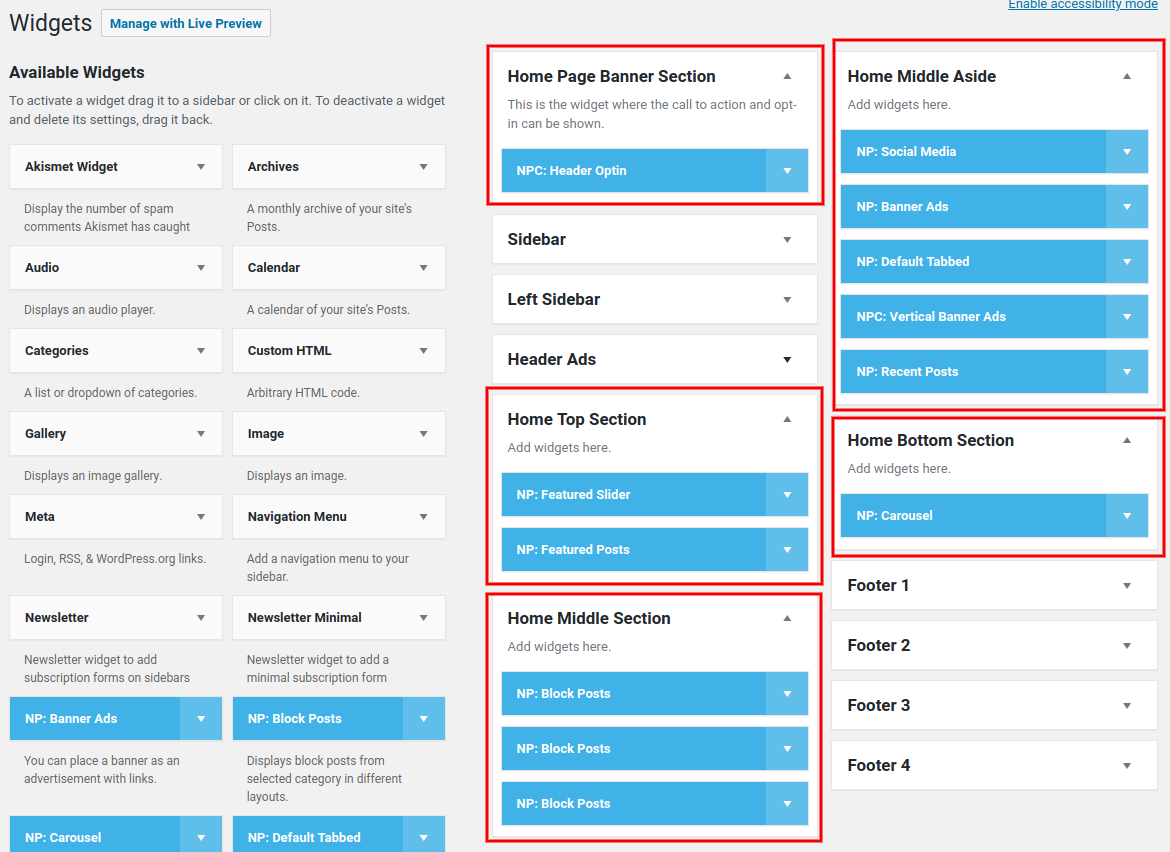
The content on the Home Page comes from the Widgets section. See the screenshot below:

- In your dashboard, click on Appearance > Widgets.
- The areas marked red in the screenshot above defines each section of your home page. You can modify those, or drag any widget you want to these sections.
- The “Home Middle Aside” section is the sidebar of the Home Page only. The “Sidebar” section is the generic sidebar which will be shown on every other post/page.
- There are 4 Footer sections (we have used only 3 of them on the site).
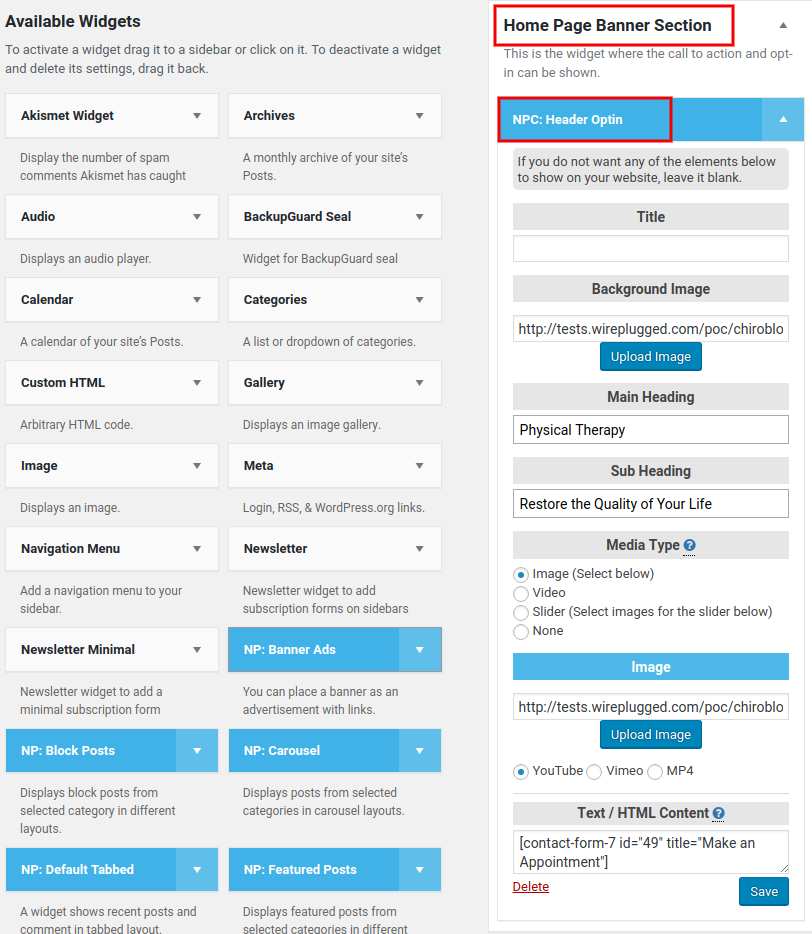
To show the header section, use the “NPC: Header Optin” widget. See the screenshot below:

- In your dashboard, click on Appearance > Widgets.
- Select the Home Page Banner Section widget block, under which you have the NPC: Header Optin widget. (If you don’t have it here, drag and drop it from the Available Widgets section).
- You can add a Title if you want to for this block.
- Click on Upload Image to select a background image for this section.
- Type in / Modify the Main Heading and Sub Heading.
- Choose a Media Type – This will help you select an image, video, slider, or none.
- Add a shortcode – In this section, you can add your contact form or any other content in the form of a short code.
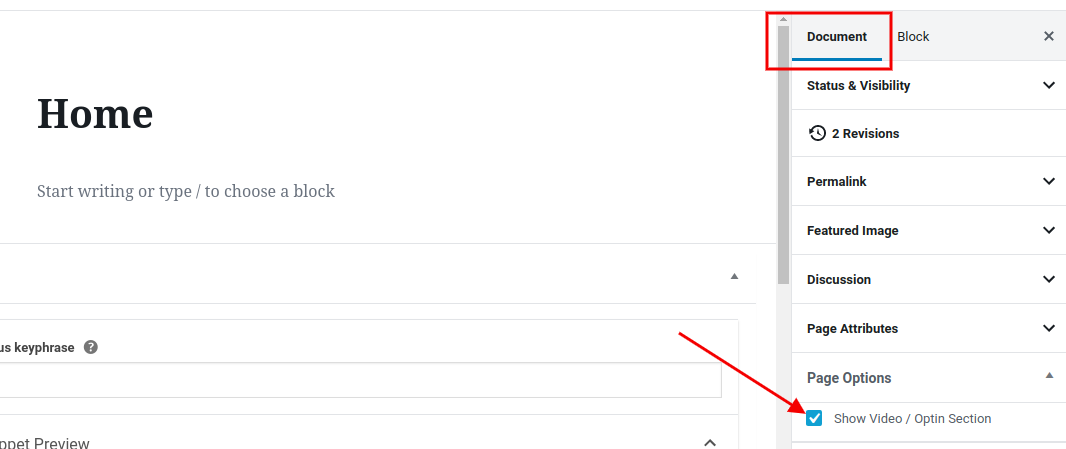
You can easily do this by unchecking the “Show Video/Optin Section” checkbox. See the screenshot below:

- In your WordPress Dashboard, go to Pages, and click on Edit on the Home Page.
- If you can’t see the Settings section on the right, click on the Gear icon on the top right.
- On the right sidebar (Settings Section), make sure that the Document tab is selected (and not Block).
- At the bottom of the Document tab, you can see the Page Options > Show Video/Optin Section checkbox. Uncheck this to hide the entire header.
Most of the settings on your blog can be changed from the Customizer. To open the customizer, Login to your WordPress dashboard, and click on Appearance > Customizer.
To know what each of the settings do, you can refer to the Theme’s documentation, available here:
>> NewsPortal documentation <<
(Start from the “General Settings” section on the left).
Most of the settings on your blog can be changed from the Customizer (refer the previous FAQ).
To change the logo, open Customizer (Appearance > Customizer in the dashboard), and click on General Settings > Site Identity. You can upload a new logo and/or use the Site Title and Tagline instead.
This can be changed from the Menu section (Appearance > Menu in the dashboard).
– Click on Appearance > Menus.
– Select “Top Menu” from the list of menus to edit.
– Under the menu structure, you can see the “Company Website” link. Click on the arrow next to it to open it.
– Add your desired URL there.
– Change the text under “Navigation Label” to what you want (for example, Your Company Home).
– Click on “Save Menu” at the bottom, and the new link will show up on the menu.
This can be changed from the Customizer.
– Click on Appearance > Customizer.
– Open General Settings > Colors.
– You can change the Footer Background color here.
This can be changed from the Customizer.
– Click on Appearance > Customizer.
– Open Footer Settings > Bottom Section.
– You can change the Copyright text or Footer Text here.
This is a common occurrence. But not to worry. To fix this quickly, please do the following:
– Login to the dashboard, and open Settings > Permalinks.
– Click the Save button a couple of times to save them. No further changes required.
This should fix it. Check the links again and it should work now.
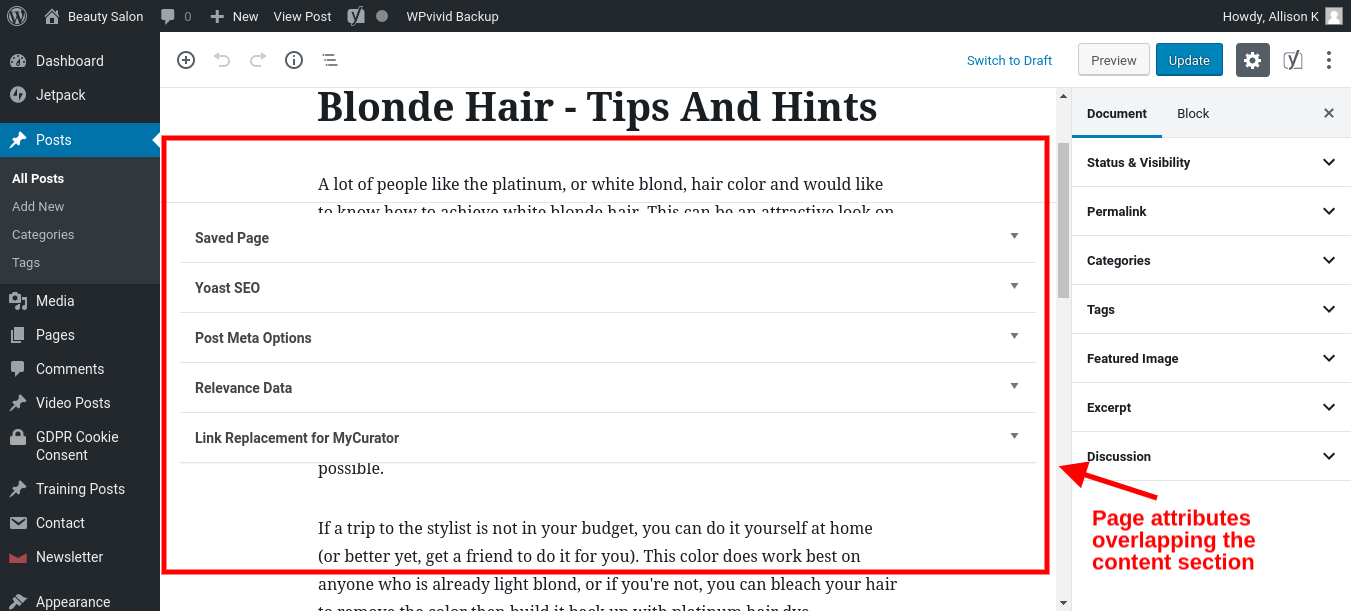
Please note that if you see something like the image below when you edit a post, this FAQ applies to you.

This is a bug that has recently developed in a slightly older version of Chrome. Chrome is working on this issue, and a fix should be coming soon (click here for more details). The solution is to update your version of Chrome to the latest available, or use another browser such as Firefox for editing your posts/pages.
- How do I activate the Akismet Plugin?
- How to enable the Classic Editor and disable Gutenberg in WordPress?
- GDPR Cookie Consent Plugin::User Guide
- Setting up the Google XML Sitemaps plugin (Video)
- Using the WordPress Jetpack Plugin (Video)
- MyCurator Content Curation Plugin::All Training Videos
- Newsletter plugin::Documentation
- Shortcoder Plugin::Demo
- Slider by 10Web Plugin::Documentation
- Wordfence Plugin::Configuration and Settings (Video)
- WPVivid Backup / Restore plugin::Overview (Video)
- Yoast SEO Plugin::Overview and Configuration (Video)